最近一段时间突然发现打包机上编译引擎安卓版本极慢,正好有现成的IncrediBuild 所以研究下能不能用来加速。IB本身是商业软件,对Visual Studio的支持已经非常好了: 既可以使用Extension形式直接调用,又可以使用命令行传参sln。但是网上关于结合NDK使用的资料就非常少,这周花了大半天终于跑通流程,就此记录一下。
IB原理及基础使用方式 IncrediBuild User Manual 里写的还是比较清楚,我主要看了下BuildConsole Command Line Interface 这个部分:
支持直接处理VS工程,如BuildConsole.exe MySln.sln /build;
支持将任务以XML形式的信息声明然后调用处理;
直接调用某个Command,然后以劫持的形式将任务分布式,如List of Supported Build Tools 里列出的make,这个稍后详细解释。
ps. 这里面第二个路子最清晰,第三个路子其实是依靠IB自动劫持make中调用clang++的行为;此外IB能够自动复制所需工具及源代码到Agent上执行编译行为。这个行为让我非常眼熟,想起之前研究UE4 Swarm分布式烘焙的时候还好奇过它是怎么跨Agent控制版本的,最后发现就是大力出奇迹的复制exe搞定…
UE4调用方式 出于好奇,就先研究了下UE4是如何调用IB的:在UBT里找到了XGE.cs包装了相关功能
ProcessStartInfo XGEStartInfo = new ProcessStartInfo( XgConsolePath, string .Format("\"{0}\" /Rebuild /NoWait {1} /NoLogo {2} /ShowAgent /ShowTime {3}" , TaskFilePath, bStopXGECompilationAfterErrors ? "/StopOnErrors" : "" , SilentOption, bXGENoWatchdogThread ? "/no_watchdog_thread" : "" ) );
这么看来是用的前面说的方法2——以XML形式声明任务并调用。随手建了个空的工程然后编译,查看了下生成的xml内容:
<BuildSet FormatVersion ="1" > <Environments > <Environment Name ="Env_0" > <Tools > <Tool Name ="Tool0_0" AllowRemote ="False" OutputPrefix ="SharedPCH.Engine.ShadowErrors.h [armv7-es2]" GroupPrefix ="** For MyProject-Android-Development" Params ="@" D:\Documents\Unreal Projects\MyProject\Intermediate\Build\Android\MyProject\Development\Engine\SharedPCH.Engine.ShadowErrors-armv7-es2.h.gch.rsp" " Path ="F:\Android\android-ndk-r14b\toolchains\llvm\prebuilt\windows-x86_64\bin\clang++.exe" SkipIfProjectFailed ="true" AutoReserveMemory ="*.pch" OutputFileMasks ="SharedPCH.Engine.ShadowErrors-armv7-es2.h.gch,SharedPCH.Engine.ShadowErrors.ha7.d" /> </Tools > <Variables /> </Environment > </Environments > <Project Name ="Env_0" Env ="Env_0" > <Task SourceFile ="" Name ="Action0_0" Tool ="Tool0_0" WorkingDir ="E:\Epic Games\UE_4.24\Engine\Source" SkipIfProjectFailed ="true" /> </Project > </BuildSet >
可以看到其实所有的编译任务都被单独组织成clang++等调用,非常清晰。
现有资料参考 网上搜了下只找到非常少的资料,而且点进去看了下都是复制粘贴的样子。以Incredibuild 加速编译 NDK 为例,譬如我本地的NDK目录是在D:\SDK\android-ndk-r21b下:
新建D:\SDK\android-ndk-r21b\Profile.xml,内容为
<Profile FormatVersion ="1" > <Tools > <Tool Filename ="make" AllowIntercept ="true" /> <Tool Filename ="cl" AllowRemote ="true" /> <Tool Filename ="link" AllowRemote ="true" /> <Tool Filename ="gcc" AllowRemote ="true" /> <Tool Filename ="clang++" AllowRemote ="true" /> <Tool Filename ="clang" AllowRemote ="true" /> <Tool Filename ="gcc-3" AllowRemote ="true" /> <Tool Filename ="arm-linux-androideabi-c++" AllowRemote ="true" /> <Tool Filename ="arm-linux-androideabi-cpp" AllowRemote ="true" /> <Tool Filename ="arm-linux-androideabi-g++" AllowRemote ="true" /> <Tool Filename ="arm-linux-androideabi-gcc" AllowRemote ="true" /> </Tools > </Profile >
修改D:\SDK\android-ndk-r21b\build\ndk-build.cmd
@echo off set PYTHONHOME=set PYTHONPATH=set NDK_ROOT=%~dp0\..set PREBUILT_PATH=%NDK_ROOT% \prebuilt\windows-x86_64::"%PREBUILT_PATH% \bin\make.exe" -O -f "%NDK_ROOT% \build\core\build-local.mk" SHELL=cmd %* XGConsole /COMMAND="%PREBUILT_PATH% \bin\make.exe -f %NDK_ROOT% \build\core\build-local.mk SHELL=cmd %*" /PROFILE=%NDK_ROOT% \Profile.xml
踩坑经验分享 CompareStringA参考网上现有资料改完之后,直接调用ndk-build.cmd -j200然而出师不利:
IncrediBuild : Error: Attempt to call unsupported import function CompareStringA
网上搜了下压根没有可靠信息。暂时没有思路的情况下进行二分定位: 绕过ndk-build.cmd直接带参调用XGConsole命令有同样的错; 去掉-j200之后保持现状; 去掉SHELL=cmd之后居然就没这个错了。
后来问了下佳神,怀疑这个是IB自己的BUG…传入的/COMMAND参数里如果带=就会出这个问题 ,令人智熄。后来验证了下确实是这样,因为传入NDK-DEBUG=1也是一模一样的下场。
job server 尝试去掉SHELL=cmd之后确实IB启动成功,结果还没高兴满半分钟又炸了:
make: INTERNAL: Exiting with 64 jobserver tokens available; should be 1024!
这又是闹啥幺蛾子?搜了下有人遇到过一样的问题 Make (Parallel Jobs) on Windows
I found this Danny Thorpe’s blog entry that explains the problems with parallel make build on Windows. Basically what it suggests is to set the following environment variable first:
set SHELL=cmd.exe
一路跟进去看了下大致的解释,这就很难搞了…如果不设置SHELL=cmd就无法并行编译,如果设置了就报上一个错。
我一开始试图找除了命令行传参之外有没有其他方法,但是官方文档Choosing the Shell 讲的很绝情:
Unlike most variables, the variable SHELL is never set from the environment.
既然改不了IB本身,那就只能对make下手了——首先看下自带的make版本信息
D:\SDK \android -ndk -r21b \prebuilt \windows -x86_64 \bin >make --version GNU Make 4.2.1Built for x86_64 -w64 -mingw32 Copyright (C ) 1988-2016 Free Software Foundation , Inc .License GPLv3 +: GNU GPL version 3 or later <http ://gnu.org /licenses /gpl.html >This is free software : you are free to change and redistribute it .There is NO WARRANTY , to the extent permitted by law .
OK, 去官网下载对应make 4.2.1 ,解压之后在Developer Command Prompt for VS 2019里运行build_w32.bat。替换进去发现没啥问题:
D:\SDK \android -ndk -r21b \prebuilt \windows -x86_64 \bin >make --version GNU Make 4.2.1Built for Windows32 Copyright (C ) 1988-2016 Free Software Foundation , Inc .License GPLv3 +: GNU GPL version 3 or later <http ://gnu.org /licenses /gpl.html >This is free software : you are free to change and redistribute it .There is NO WARRANTY , to the extent permitted by law .
强制设置SHELL 翻了下代码发现默认的shell使用的是sh.exe,这里直接改成cmd.exe即可。
@@ -31,7 +31,7 @@ #ifdef WINDOWS32 #include <windows.h> -const char *default_shell = "sh.exe"; +const char *default_shell = "cmd.exe"; int no_default_sh_exe = 1; int batch_mode_shell = 1; HANDLE main_thread;
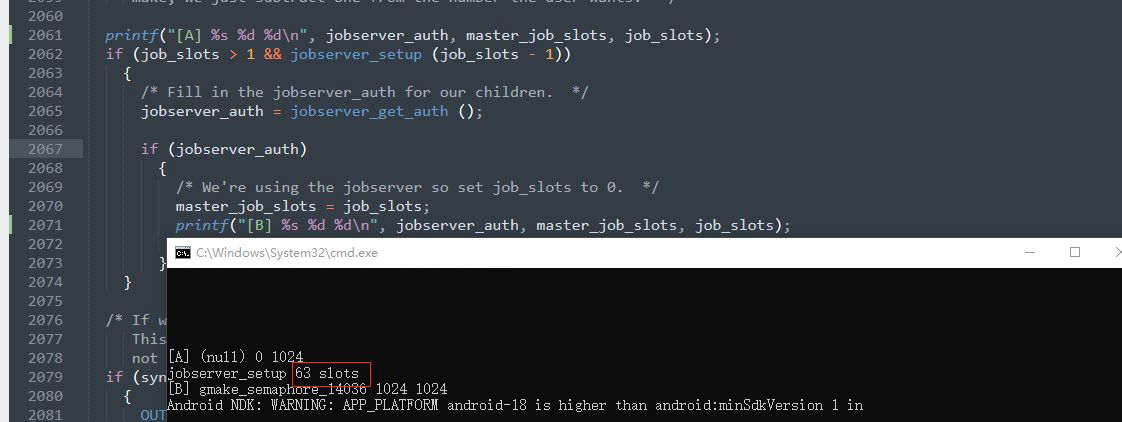
修复极端情况 替换进去之后结果发现还是一样的问题,简直是白高兴.jpg…这次具体看了下make里关于job server的实现,本质就是用一个信号量来处理,理应不会出问题才对。多加了几行log看看:
这里就发现违和之处了: IB传入参数应该是-j1024,但是windows版本使用的是信号量所以不能超过MAXIMUM_WAIT_OBJECTS即64,所以导致了问题的发生。找到根源之后就好办了:
@@ -2058,6 +2058,7 @@ submakes it's the token they were given by their parent. For the top make, we just subtract one from the number the user wants. */ + if (job_slots >= MAXIMUM_WAIT_OBJECTS) job_slots = MAXIMUM_WAIT_OBJECTS - 1; if (job_slots > 1 && jobserver_setup (job_slots - 1)) { /* Fill in the jobserver_auth for our children. */
绕开NDK-DEBUG=1传参 前面提到IB有=的问题,所以gradle里不能直接在commandLine那步将这个参数传入。这个问题会比上一个简单很多,使用环境变量的方式传入即可:
environment "NDK_DEBUG" , "${NDK_DEBUG}"
小结 使用修改过的make终于把IB结合NDK成功跑起来了,不过目前其实还有遗憾——其实目前的修改方法是强行将-j传入的并行数降到64,更好的做法其实是换一个job server实现从而让IB能够跑的更带感~
顺便IB的调用方式也很有意思: 基于XML的Task形式可读性非常高,一眼就能看明白具体的任务;自动劫持make的方法则是特别方便,虽然出了问题也是绕的我要吐了…
